Pages

Friday, 31 May 2013

Bath Paints

We were faced with another wet day on Tuesday, the first official day of our half term holiday, so I got around to making up some bath paint for the kids to enjoy.  I've been meaning to do this for a while and as we skipped bath time on Monday due to a late pub supper, I had the perfect excuse!  

I've seen many "recipes" on the web for this so I made one I vaguely recalled using clear bubble bath and cornflour, along with some food colouring.  I kept the food colouring to a minimum, just in case it stained anything but it was fine - in fact, the colours were a little muted so I would probably used some more next time.


I used 1 cup of bubble bath (or body wash) - just make sure it is clear or the colour won't work as well.  Add around 2-3 tbsp cornflour, or enough to thicken it up to your desired consistency.  Separate the mixture at this point, and add a few drops of food colouring to the different pots.

Add two paintbrushes and some eager children then let loose on the bath tiles!  


They loved it, drawing pictures and writing letters on the walls.  Plus they had just as much fun washing it off the walls with the shower afterwards!


Wednesday, 29 May 2013

Mamatography - Week 21

A successful week of healthy eating meant I could fit into my skinny jeans *relatively* comfortably by Thursday - hooray!  Here's what else we got up to.

Day 139 - Sunday 19 May
We visited friends back in London, and Spiderboy and Doodles were fascinated by the iPad my friend's daughter was allowed to use!  I do sometimes let them play games on mine but not often enough to ensure it isn't a novelty when I do :)


Day 140 - Monday 20 May
Doodles was very proud of the picture of Daddy she drew on the chalkboard.  I frowned at Spiderboy when he pointed out that Daddy's legs & arms came straight out of his head :/


Day 141 - Tuesday 21 May
I spent the week detoxing / dieting / generally trying to be healthier (its amazing the spur an old friend's wedding can have!) and loved how colourful my plate looked every night.  Wholegrain rice with stir-fried veg baked inside a red pepper with a salad on the side - yum!


Day 142  - Wednesday 22 May
Photo failure...it seems I always have to have at least one day where I forget!  A busy day with school & nursery photographs, and a ballet lesson meant there was no time to snap.

Day 143 - Thursday 23 May
I whipped up a homemade body scrub and was pleasantly surprised by the outcome, considering it was my first time!  You can find the recipe here.


Day 144 - Friday 24 May
I spent the day sorting out the Leavers Hoodies for Spiderboy's school - a simple task we as the PTA committee volunteered for which turned out to be more complicated than expected!  Still, everybody was pleased with the end result at least :)


Day 145 - Saturday 25 May
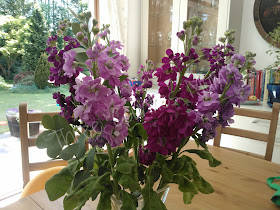
I had a birthday lunch for my mother-in-law and she bought me along these gorgeous Stocks which brightened up the table.


This post is part of the Mamatography 2013 Project hosted by Momma Jorje and Diary Of A First Child.  We are taking (at least) a photo a day to keep a record of our year.  Join us at any point during the year and start sharing your own daily photos!


***
Without further ado, here are the Mama/Papatography2013 participants!

Tuesday, 28 May 2013

Cinnamon Body Scrub

I needed something for the mother-in-law's birthday last week so after a bit of researching on the net, I came up with this Cinnamon Body Scrub.  It was super easy to make, and smelt delicious.  

I had an excess left over after filling the jar so used it myself this weekend, and can report that my skin was wonderfully smooth afterwards!


All you need is:

1 cup brown sugar
1/2 cup of sweet almond oil 
12 drops of cinnamon essential oil

Mix the essential oil into your carrier oil, and add it to the sugar until you have the consistency of wet sand.  Mix well and store in a jar.


Obviously you could use any essential oil for whatever is your favourite smell (or that of the person it is for).  

I found some very useful info here on making your own body scrubs, including salt and sugar scrubs, and then just adapted it for my own recipe.

I prettied the jar up with a label and a ribbon and it looked great - a personalised gift that anybody would be glad to receive!

I used a tea-cup for measuring purposes.


Saturday, 25 May 2013

Shirt & Tie Card

I needed to keep DD occupied while I was making dinner last week so I dug out supplies to make a Father's Day card.  I think this shirt & tie design is so cute, and something that most kids can associate with daddy!


It is really simple to make.  You will need:

Piece of A4 card (I used black but white would work even better)
Piece of coloured paper
Scraps of tissue paper
Glue
Scissors

Fold your A4 card in half.  Make a small slit in the top, right in the middle.  Fold the edges downwards to make a collar.


Cut a tie shape from coloured paper - I actually used foam for mine, as I thought it would stand proud from the card a little more.  


Give the tie cut out and the selection of tissue paper to your child and let them stick to their heart is content!  When the tie is dry, stick it on to the front of the card and glue the collar pieces down.


There you have it!  Just add a few scribbles inside and daddy will be happy :)


Friday, 24 May 2013

Why I blog...

In case you're wondering, I don't do this because I think I'm a shining example of motherhood...I am FAR from that.  I'm not sure I get this competition between mums.  We're all aiming for the same thing right?  Bringing our children up the best we can without making *too* many mistakes.  There are no prizes given out at the end, except to see our kids hopefully go out into the world as well-adjusted and developed adults.  So why not learn from each other as we go?  Each of us has different strengths and weaknesses, and I personally learn so much and get such wonderful ideas by reading other mummy blogs.  

Motherhood is my job - my full-time job.  Although I always had a job before I had DS, I never had a career as such...this is my calling.  And yes, I take pride in it.  But I'm not showing off or putting myself up on a pedestal, rather sharing some fun ideas, recipes and knowledge that I've found to work for our family.

This blog is my hobby.  I love creating things and I love writing so what better way to combine the two than writing a blog!  But a hobby it remains, at present at least.  So there will be times when I get to post lots and times when it is few & far between.  If I have to choose between hanging out with my family or writing about it, I will always choose the former.

The blog is growing and changing all the time, as I learn more and discover new tricks and ways within the mysterious world of blogging.  So now I thought it was about time I put some slightly more personal names to my family rather than the DH, DS and DD they are currently known as.

DS, our Number 1 Son, was born in 2008.  He has been consistently obsessed with Spiderman for the last 1.5 years and it shows no signs of abating just yet.  So I hereby christen him Spiderboy.


Dear Daughter joined our family in 2010 and she has many nicknames, one of which is Doodles so I'll stick with that for the purposes of blogging.


And finally, my kind, patient Dear Husband, who goes out to work everyday to support us all with only the occasional moan, shall henceforth be known as Motorbike Man.  After his family, this is his pride & joy - the Yamaha BT1100, which looks like this:


And here he is introducing our boy to it...at 22 months old!


And in case you thought he was sexist, here he is introducing it to our girl...although she was a little older at 2.5 years!


I just hope they don't want to ride it when they hit 16!

So this is me.  And my family.  Three Counties Mum, Motorbike Man, Spiderboy and Doodles.  And you are very welcome along on our journey.


Thursday, 23 May 2013

12 Minutes Reconnection

DS does love the occasional Ribena so I was disappointed that our recent holiday co-incided with an event they were holding to create a new Twelve Minute Manual on play for their website.  

This article explains that a recent study about working guilt has found that parents feel they need at least 30 minutes to reconnect with their child after a day's work, but in reality they can do that in just 12 minutes.  When I first read that, that didn't sound a lot but you can actually have a really fun game in that short time!

The manual contains 30 ideas of simple play to help you reconnect with your child after a day at work and although I missed out on contributing, I got sent a copy on our return from holiday.  

It has some simple but effective suggestions in it.  Although I don't work outside the home, after a day rushing around doing chores while they are at school & nursery, I often need to re-adjust after picking them up and change my pace to reconnect with them.  

I tried out a few of the ideas from the manual, such as drawing hopscotch with chalk - such a simple thing but one both my kids loved!


And although I haven't tried it yet (not feeling brave enough perhaps?!), I am definitely going to let DD lose in my make-up bag and see what she makes me look like!  I like the idea of blindfolding each other and tasting three different foods to see who can guess most accurately too.

I was also interested to read about phrasing your questions to get more information from your child.  I often get met with a nil response to my query of "what did you do at school today?" so lately I've tried changing tack and am finding that "what was your favourite thing you did today?" and "tell me about a game you played today" has meant I get to learn much more about DS's day.

The manual had a few other ideas that we enjoy regularly, like building a fort with sheets & blankets and having a picnic for dinner (indoors or outside!)  Simple ideas are often the best - we can easily get wrapped up in toys and gadgets when we really don't need them.

Plus when you're done with all the play, you can cool down with a tasty glass of Ribena :) 


Mamatography - Week 20

Still can't seem to get back into the swing of things over here at TCM HQ...that holiday was obviously far too long & enjoyable!  Still, only one photo missing from this week's post :)

Day 132 - Sunday 12 May
Grandad & Nanny took "their old car with no roof" to a rally meet and we joined them for a picnic.  The weather was too cold for DS to ride home in the car but he has already put in a request for a ride on his birthday!


Day 133 - Monday 13 May
My sister bought me a cute spoon silicone mold and despite my intentions to try it out with a hot chocolate, I ended up making these white chocolate spoons and playing a trick on the kids when I gave them a yoghurt.  I didn't say anything, just waited for them to notice - and once they did, DS couldn't stop himself biting them!


Day 134 - Tuesday 14 May
I made a child-friendly paella which the kids devoured!  Recipe coming soon.


Day 135 - Wednesday 15 May
A friend dropped round this beautiful sunny flower to cheer me up when I was feeling a bit blue - it has lasted nearly 3 weeks and still sits on my kitchen windowsill making me smile :)


Day 136 - Thursday 16 May
Photo failure...

Day 137 - Friday 17 May
A preemptive strike on Father's Day...DD made this lovely "shirt & tie" card which we've hidden away for daddy.


Day 138 - Saturday 18 May
I had a trip down memory lane teaching the children to play hopscotch.  They absolutely loved it, and rushed to the window each morning in the following days to see if their hopscotch grid was still there or had been washed away by the rain!


This post is part of the Mamatography 2013 Project hosted by Momma Jorje and Diary Of A First Child.  We are taking (at least) a photo a day to keep a record of our year.  Join us at any point during the year and start sharing your own daily photos!


***
Without further ado, here are the Mama/Papatography2013 participants!

Wednesday, 15 May 2013

Mamatography - Weeks 17, 18 & 19

I have failed miserably in my Mamatography challenge over the past 3 weeks so this is a bit of a catch-up post...not every day is captured but here are some of the best bits!

Day 111 - 21 April
Making the most of the infrequent sunshine, we spent most of the day in the garden.  DS is learning about mini beasts in school so I took the opportunity to show him a few critters.  Well, I say "I" but what I really mean is I spotted them and then instructed daddy to do the honours.  Here is DS meeting a millipede. 


Day 112 - 22 April
Again spent in the garden, but this time we planted our herbs and veg!


Day 113 - 23 April
Impromptu tea party in the garden after school / nursery.


Day 114 - 24 April
A fantastic end to the evening...get home from a trip to the cinema to find the babysitter has done all my ironing!


Day 117 - 27 April
A walk in the woods on a Sunday afternoon.


Day 118 - 28 April
My dad loves playing tricks on people...I should be used to it by now!  When we went over to help unpack after his recent house move, he had hidden some fake body parts around the place for the kids to discover - much to their amazement *AND* enjoyment...  You know the kind of thing...a hand down the sofa, a leg in a cupboard...this is normal, right?!


Day 120 - 30 April
The best hot chocolate you will ever taste.  Fact.  


Day 123 - 3 May
The beech tree in our garden is now in full bloom.


Day 124 - 4 May
Such a gorgeous sunset over our house...


Day 125 - 5 May
The best part about making cakes - licking out the bowl!


Day 126 - 6 May
Enjoying the petrol pump I made for them.


This post is part of the Mamatography 2013 Project hosted by Momma Jorje and Diary Of A First Child.  We are taking (at least) a photo a day to keep a record of our year.  Join us at any point during the year and start sharing your own daily photos!

***
Without further ado, here are the Mama/Papatography2013 participants!

Monday, 13 May 2013

Quick & Easy Banana Ice-Cream

This is clearly not ice-cream as we know it but the kids were fooled and polished off a bowl without hesitation.  Nice to have another alternative to banana cake when I've got over-ripe bananas in abundance!


Ingredients
6 ripe bananas, peeled & sliced
1-2 tbsp fromage frais
1-2 tbsp fresh orange juice
1 tsp vanilla extract
A few drops of lime juice to taste

Method
Lay the banana slices out on a tray and freeze for around an hour (or until frozen).


Remove from the freezer and put the pieces in a food processor or blender along with the fromage frais, orange juice and vanilla extract.  Whizz until smooth, adding more fromage frais and / or orange juice to get your desired consistency.  Add the lime juice to taste and serve in bowls with chocolate sprinkles on top!

Pour the remainder into a tupperware box and freeze - remove from the freezer around 10 mins before you want to use it or it will be too hard to scoop.


Tuesday, 7 May 2013

Lumberjack Cake

I made this on Sunday and whilst it took a long time to cook (especially when you have impatient children watching the oven!), it was worth the wait.  I convinced myself it was healthy too, what with all that fruit in :)  

When I told DS that it was called a Lumberjack cake, he said "a Numberjacks cake?  Wow!"  I had to disappoint him and let him know it wasn't anything to do with our CBeebies friends and then explained what a lumberjack is.  To which he said "oh, does the cake have wood in it then?"  Sigh...


Ingredients
3 small eating apples, peeled and diced
200g dried dates (stones removed), chopped
1 tsp bicarbonate of soda
250ml boiling water
125g butter, softened
1 tsp vanilla essence
220g caster sugar
1 egg
225g plain flour

Topping
60g butter
100g brown sugar
125ml milk
50g desiccated coconut

Method
Put the chopped apple & dates into a bowl and add the bicarb and the water.  Cover the bowl with clingfilm and let soak for 10-15 minutes.

Meanwhile, beat the butter, vanilla essence, sugar and egg in a bowl until light and fluffy.  After the allotted soaking time, add the apple & date mixture into the creamed butter mix and stir in the flour.

Pour the mix into a greased tray-bake pan or similar and bake at 180 (fan) for 50-60 minutes.

When the cake is ready to come out, add the topping ingredients to a small pan and heat slowly.  Remove the cake from the oven and pour / spread the topping evenly on the cake.  Return to the oven for a further 20-30 minutes.

Let the cake stand for 5 minutes (if you can bear it) after removing it from the oven before slicing.

I just ate the final piece tonight (2 days after making it) and it was still deliciously moist so it keeps well in a tupperware container.


Monday, 6 May 2013

Cardboard Box Petrol Pump

So the kids have been whizzing around in the toy car this weekend, and while they were playing this morning hubby & I overheard DD saying she needed petrol.  The toy car does have a little petrol cap and we looked out to see DS pouring the contents of his water cup into the hole!  Shortly after, I recalled seeing a petrol pump made from a  cardboard box on the web somewhere and before I knew it, I was well on my way to recreating one for my little guys to play with.


Luckily we had some large cardboard boxes for recycling sitting in the garage so I found one I thought would be the best shape and taped it together.  I knew were were going to paint it so didn't want to use ordinary sticky tape as the paint wouldn't adhere -instead I used black "electrical" tape, which would blend in with it being painted black.  Then I set the kids to work with the paintbrush.


After the paint had dried, I cut out some letters (from foam sheets) and stuck them on the front, along with a counter & some buttons / dials.  You could be much more elaborate than I was but I had two little people dancing around me waiting for the end product!


I used an old spray cleaning bottle and a piece of hose to make the pump.  I cut a hole in the base of the bottle and slotted the hose into it - it was quite a tight fit so I didn't need to worry about it falling out.  Then I cut another hole in the bottom of the cardboard box to slot the other end of the hose into.  Finally, I cut a large hole in the side of the box to hook the "pump" into.


I had intended to make the sign on top swivel round with one side reading OPEN and the other CLOSED but I found that it wasn't sturdy enough to withstand the turning so I taped it into place with just the OPEN side showing.  This was made from two oval pieces of card stuck together with a straw taped between them...the straw was the weak link, it was too flimsy!  A stick (or even a pencil) would have been better.  I wrote the OPEN sign on with glitter glue.

They loved it and played with it for ages, taking it in turns to be the petrol pump attendant versus the car driver.