Pages

Wednesday, 30 January 2013

Mamatography: Week 4

Week 4...

Day 20 - Sunday 20 January
Making good use of the snow...DD discovering the frozen coloured balls we made!


Day 21 - Monday 21 January
Nearly all day spent on my new role as PTA Chairperson for DS's school so no photograph I'm afraid...

Day 22 - Tuesday 22 January
How many Fruit Shoots will Tesco allow you to buy?  Until the shelves are empty, it turns out!  Buying up supplies for the school disco...


Day 23 - Wednesday 23 January
A day for me & DD, and we started it off by having a chilly breakfast with the ducks on their frozen pond!


Day 25 - Friday 25 January
DS got a marble run as a Christmas present and you wouldn't believe the places I have been finding these little beauties...


Day 26 - Saturday 26 January
A belated Burns Night supper with friends and their older son (14) helped DS make the snowmen he so badly wanted!


That's all...until next week!


***
Without further ado, here are the Mama/Papatography 2013 participants!

Wednesday, 23 January 2013

Mamatography: Week 3

Week 3 of Mamatography - I managed a photo for each day this time *and* I'm on time - hoorah!

Day 13 - Sunday 13 January
A trip to visit Nanny & Grandad finished with fun in the park after lunch!


Day 14 - Monday 14 January
Our first snow of the year...beautiful.


Day 15 - Tuesday 15 January
With both kids at school & nursery, I experimented with leftover crayon pieces and made these cute Valentine crayon hearts - post coming soon!


Day 16 - Wednesday 16 January
A quiet day for DD & I at home but this was my view from our lounge while I enjoyed a cup of tea in the early afternoon.


Day 17 - Thursday 17 January
After a night of continued coughing, I couldn't rouse DD the next morning...think she would have slept through a bomb going off!


Day 18 - Friday 18 January
A serious dump of snow meant that school closed 45 minutes after it opened so while DH went to fetch DS back home, DD watched the snowfall out of the kitchen windows.


Day 19 - Saturday 19 January
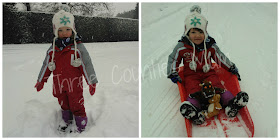
Fun, fun, fun in the glorious snow!  

***
Without further ado, here are the Mama/Papatography 2013 participants!

Chinese Lanterns

Do you remember making these as a child?  I do...and while we were passing the time indoors on a snowy Saturday after the kids were tired of snowman building, I showed them how to make these.  


This year, I'm trying to mark each celebration in the calendar...Burns Night, Chinese New Year, Pancake Day, Valentines Day, etc. with a little craft so I began thinking about these a few weeks ago.

They are so easy to make, the kids love it.  All you need is:

Red paper (or any colour will do, but they are traditionally red)
Scissors
Sticky tape

Fold your paper in half length ways, and cut slits all the way along the fold (staying around an inch away from the top).


Open the paper out and tape each end together to make the lantern.  


You could add a little paper strip for a handle to hang these (as I seem to recall doing as a kid) or put a LED tea light inside, like we did - the lanterns are now sitting on their beside tables and I was finally able to throw away the gingerbread houses from Christmas!

If you want to get even further into Chinese New Year, Red Ted Art has a great round-up of crafts, and Twinkl has some printables that I will be using to decorate the house when we cook our Chinese dinner on 10 February!


Monday, 21 January 2013

Ham, Cheese & Onion Muffins

Although I posted a recipe for cheese & ham muffins before, this one is way easier to make. When I called DS to the table for lunch on Sunday and he found two of these waiting for him, he said "Cakes?  For lunch, mummy?!  Yum!"  


I think this must have been an American recipe originally (I found it again recently, scribbled on a piece of paper in one of my cook books) as we don't tend to use cups as measurements so just to show you what I'm using...

This only comes out of the cupboard when the Mother In Law comes to visit!

Ingredients
1 cup of milk
2 cups of grated cheddar cheese
1.5 cup self-raising flour
1 egg
1 onion
4/5 slices of ham

Method
Chop your onion, and fry in a little oil or butter then set aside.  Whizz the ham in the processor so it shreds (or you could just tear it up if you weren't as lazy as me!)

Mix all the ingredients into a large bowl and give it a thorough stir.  Spoon in muffin cases and bake for 20-25  mins at 180 degrees.

Note: If you have them, use silicone cases - the muffins will slip out easily but they tend to stick to paper cases due to the lack of butter in this recipe.


Saturday, 19 January 2013

Spicy Slow Cooked Chicken

I saw a recipe post this week for something similar but when I came to make it, I realised I didn't have half the ingredients I needed so I made this up a bit as I went along but boy, was it tasty!  I served it with tagliatelle last night, and made the left-overs into wraps for lunch today.   Don't be put off by the long list of ingredients - you'll already have most of them in your cupboards.


Ingredients
2 tbsp brown sugar
1 tsp cumin seeds (crushed)
1/2 tsp mild chilli powder
1/4 tsp dried oregano
1/4 tsp cayenne pepper
1/2 tsp paprika
1 tsp mixed pepper blend*
2 large chicken breasts
Olive oil
1 onion, peeled & chopped
1 green chilli, deseeded & chopped
1 red chilli, deseeded & chopped
1 clove garlic, peeled & crushed
1 can tomatoes
1 cup orange juice
Juice 1/2 lime
1 tbsp red wine vinegar
1 tsp Tabasco


Method
Turn your slow cooker on to Low.

Mix the first 7 ingredients together in a bowl, and rub half of it onto the chicken breasts.  Brown them in a hot frying pan, remove and set aside.

Add the onion, garlic and chillies to the frying pan and cook for 5 mins.

Put the chicken in the slow cooker, and add the onion, garlic and chillies on top.

Mix together the tomatoes, orange juice, lime juice, vinegar and Tabasco  and add in the remaining spice mix.  Pour the sauce on top of the chicken in the slow cooker.  

Cook on Low for around 6 hours.  At this point, I still had too much sauce so I removed the lid and cooked on High for a further 1.5 hours by which point it was perfect.

If you're serving this in a wrap, sprinkle some cheddar cheese on top of the chicken before rolling it up - yum!


*Thanks to my lovely Danish friend who keeps me in regular supply of Peber Blandig, I use this all the time in my cooking but it is just a blend of 4 types of pepper - black, white, green & red - similar to this or you could use a pinch of spice mix.


Friday, 18 January 2013

Mamatography: Week 2

Week 2 of my challenge and I failed...not only am I late in posting but I forgot a day!  I should have posted this earlier in the week...must try harder next week ;)

Going forward, I'll be posting pictures from Sunday to Saturday on the following Tuesday to give myself some headroom...hence they are two pictures missing this week (I already posted them in last week's!)

Day 8 - Tuesday 8 January
The last day of freedom before school started again so we spent it swimming at The Spectrum!


Day 9 - Wednesday 9 January
Continuing my resolution not to throw food away, I made beetroot muffins to use up 2 beetroots that were sitting in my fridge.


Day 10 - Thursday 10 January
Failure...I forgot to photograph ;(

Day 11 - Friday 11 January
It was all too much for DD who fell asleep on the armchair clutching Big Dolly after lunch.


Day 12 - Saturday 12 January
DD had fun with the Rainbow Salt Tray I made her.

That's all...but I *will* be better organised for the next post :p


mtbadge2This post is part of the Mamatography 2013 Project with Diary of a First Child and Momma Jorje. We are taking (at least) a photo a day to keep a record of our year. Join us at any point during the year and start sharing your own daily photos!


Without further ado, here are the Mama/Papatography2013 participants!

Rainbow Salt Tray

I saw this idea and thought it was a fun idea to get little ones to discover shapes, colours, numbers or anything else hidden underneath the salt.  

It was easy to put together - you just need:

A baking tray (I used the deepest one I had to avoid too much being flung over the sides!)
Packet of salt
Coloured paper sheets
Sticky tape or glue
White shapes (or numbers)
Paintbrush

Overlay the coloured sheets until you have a section of each showing to make the "rainbow"  effect and stick together, making sure it will fit within your tray.  


Stick your shapes or numbers on top.


Pour the salt on top generously and let them loose with a dry paintbrush!


DD loved discovering all the shapes hidden underneath, and kept her busy while I made dinner that evening - result!

Thursday, 17 January 2013

Seafood Pilaf

I made this for DH & I last night, and it went down well.  It was from a Waitrose recipe card but I adapted it slightly to make it easier!  Little Miss Fussy Pants would no doubt turn her nose up at it but would give it to DS if I made it again - it wasn't too spicy.


Ingredients (serves 2)
Half butternut squash, peeled & cubed
1 tbsp harissa paste (but some random spice paste would work just as well)
2 tbsp olive oil
1 clove garlic
150g basmati & wild rice
250-300ml fish stock
200g frozen seafood (I used the Fruits de Mer mixture but you could equally just use prawns)
Grated zest & juice of 1/2 lemon

Method
Toss the cubed butternut in 1 tbsp olive oil and the spice paste.  Roast at 200 for 25 mins.

While it's cooking, heat the other tbsp of olive oil in a sauce pan and add the garlic.  Cook for 1 min then add the rice and stir well so it gets coated in the oil.  Add the stock to the pan, bring to the boil and cover - simmer for 15 mins, ensuring you don't let it boil dry.  (I ended up adding another 50 ml of water to avoid this, making my total up to 300ml).  

Add the seafood, stir well and replace the lid.  Leave to cook through for 10 mins, stirring to ensure it doesn't stick.  Remove the butternut squash from the oven and stir the rice & seafood mix into the roasting dish.  Squeeze over the lemon juice, throw in the zest and serve.  


Monday, 14 January 2013

Puzzle Organisation

DD is crazy mad on puzzles right now - she will sit and do a 35 piece one by herself which at 29 months is pretty impressive, even if I do say so myself ;)  What is not impressive though is the amount of space the puzzle boxes are taking up in the play area.  So last week I came up with a plan, & here it is.

I had 4 different Peppa Pig puzzles, each in a separate box which had been stood on / broken in some way.


Tired and sorry box after somebody's foot landed on it!
Take one biscuit tin which is inexplicably empty...*whistles nonchalantly*


I put each puzzle into a resealable food bag and placed it in the tin.


Cut the picture from one puzzle (I chose the one with the most pieces as that is one she is most likely to need to refer to) and glue / tape it onto the lid of the biscuit tin.


I then cut small pictures out of the other puzzles (the side of puzzle boxes usually has a tiny picture on it) and taped them to the side of the biscuit tin, including a repeat of the large picture so there was one of each of them.


I freed up space from 4 whole puzzle boxes by putting them all into one tin.  The best part was that the bags are easy to transport so we took one to Grandad's house yesterday to keep ourselves busy over lunch :o)


Saturday, 12 January 2013

Doll's Skirt

As soon as I saw the gorgeous skirt that Ashley over at Make It Love It made for her daughter's room, I knew I wanted to give it a go - this is my version.  

DD's favourite doll, Big Dolly, is lacking in the wardrobe department so it was a good excuse.


 Ashley's tutorial is wonderfully clear so I won't repeat the instructions here - just head over to her site if you want to see how to do it properly.  I was using up scraps of material so my skirt didn't bunch out as much because the material piece was not very long - just twice the width of the doll's waist (same with the netting underneath).  I also like to do my sewing in the evening so this was made entirely by hand, not machine.  

Front of the skirt

Back with netting
DD was thrilled this morning to find it ready for Big Dolly to wear...and now she has asked for a top to go with it!  Guess that will be tonight's job :/


Thursday, 10 January 2013

Lamb Pasties

I'm sick of making curries using the left over meat from Sunday roasts so this week I made these with the left over lamb - DH loved them!


Ingredients (makes 5)
Shortcrust pastry (I used half a packet, i.e. one roll)
Left over roast lamb (probably around 200g)
Handful of peas, cooked
Natural plain yoghurt (3/4 tablespoons)
Mint sauce (1 teaspoon)
Egg, lightly beaten


Method
Whizz the lamb in the food processor so it shreds. Mix the yoghurt & mint sauce in a bowl, and add the lamb and peas.

Roll out the pastry and cut circle shapes (I used a saucer to cut round, & found it was a good size). Put 2/3 teaspoons of the lamb mixture into the middle of each circle and wet the edges with water before folding over in two. The water will seal it together but I crimped with a fork for extra security.

Place on a baking tray and brush generously with the beaten egg. Bake at 180 degrees for around 25-30 mins.

Wednesday, 9 January 2013

Mamatography: Week 1

Inspired by my Review of 2012 post, this year I'm taking on the Mamatography challenge!  I take tons of photos of the kids, and decided to sign up for this as a way to make me take more interesting pics and think a bit more about them rather than just snapping away.  Basically it entails taking a photo every day of the year, and putting them in a weekly post.  They won't always be amazing photos (in fact I'm sure most of them won't!) but at the end of the year I will be interested to look back and see our everyday life over the past 365 days.

So this is my first Mamatography post...for week 1 of 2013!

Tuesday 1 January
NYE is a non-event for us these days so instead we enjoyed a New Year's Day lunch with friends then spent the afternoon making thank you cards for all the Christmas presents we received.


Wednesday 2 January
Daddy's first day back at work so we decided to stay home in our pyjamas for the day...and built the biggest train track we could!


Thursday 3 January
A trip to Alice Holt Forest for the Stick Man trail.


Friday 4 January
Exploring the ships in Portsmouth Harbour and a tea party when we got back home.


Saturday 5 January
Trying our hand at apple printing & painting!


Sunday 6 January
Roast lunch with Grandma & Grandpa and a walk to burn it all off afterwards.


Monday 7 January
Another lazy day for us (making the most of the holidays!) so we set up some shops - a supermarket and a patisserie and had fun taking turns to be customers!
***
Without further ado, here are the Mamatography 2013 participants!

Sunday, 6 January 2013

Recycling Christmas Cards as Gift Tags

For a few years now I've been recycling my Christmas cards and turning them into gift tags.  It is really easy and I like reusing them rather than just throwing them away after a few weeks.  If you are really organised, you could make a note of which card came from which person and reuse their card when giving them a gift but I have never gone that far!

Gather all the cards you want to use - personally I keep them all and then use the ones I need when it comes to it...you never know what size or shape future presents will be!


All you need to do is take your cards and cut them in half, i.e. remove the side that has the message in, and discard it.  Trim to size if need be - obviously small cards work the best but I do use large cards too.  


Punch a hole in the top of your cards... 


...and file them away until next Christmas!


When the time comes, add some ribbon / thread through the punch hole and attach to a present with your written message on the back.  


Free gift tags ;)